Showing posts with label appetizer. Show all posts

8 November 2015

You say tomatillo, I say tomato...

Spiraling quickly toward the end of gardening season, here's a bright late-harvest recipe for before the dutch oven gets dusted off.


Maybe not technically a posole, but a fantastic green tomato fish chowder (garnished with the world's smallest radish).

North Atlantic End-of-Season Posole

adapted from bon appetit October 2015 issue

1-3/4 lbs green tomatoes
2 tbsp olive oil
1 red onion, minced
2 cloves garlic, smashed then minced
1 fresh hot peppers, thinly sliced
all the cilantro that survived the first snowfall (or 1 cup)
2 cod loin fillets*
kernels from 2 cobs of sweet corn**
2 cups seafood stock***
garnish for serving: sliced fresh hot pepper, radish, lime

*yeah, okay, cod loins vary in size, but use enough to serve a decent soup-amount to 4 people... a pound to a pound and a half will do

**blanch very fresh sweet corn in boiling water for 4 minutes then plunge in ice-cold water to stop the cooking process; using a sharp knife, cut the kernels off the cob... or use a heaping cup of frozen corn

***made from fish heads and/or shellfish shells (ours was in the freezer made some time ago, likely from shrimp heads and shells, maybe trout heads or lobster scraps too)


True, we had to substitute nearly every ingredient, but that's just the
cost of living on an island in a cold, harsh climate.
Wash and quarter the green tomatoes, removing the stem and any unsightly spots, bruises, frostbite, etc.  Puree in a food processor or blender and set aside.

In a heavy-bottomed saucepan, heat oil over medium.  Cook onion, garlic and hot pepper until soft.

Add half of the green tomato puree and cook until the mixture reaches a good steady boil.  Add cod, corn, and seafood stock.  Bring to a simmer and maintain it to poach the cod until it is cooked through, about 8-10 minutes.

While the cod is cooking, roughly chop the cilantro and add to remaining green tomato.  Puree together.

When the cod is cooked, remove soup from heat and stir the green tomato mixture to incorporate, breaking the cod into chunks.  

Ladle into bowls, garnish with hot pepper slices and radish and squeeze a bit of lime juice over top.  

Serves 6 as a first course or 4 as a light meal.

~~~

Whenever we buy a gourmet cooking magazine, we excitedly scan the pages.  Ooooohing and ahhhhing.  Imagining a dinner party.  Looking up ingredients that are probably readily available in major cities but impossible to find on this island in the North Atlantic. Or at least impossible to find all at the same time.  (We fantasize constantly about grocery stores that you can walk into with a list and walk out of with everything ticked off.) 

It's possible there is some sort of psychotic disorder that makes us buy these magazines over and over again.  Taunting ourselves with them.  Salivating over meals we'll never eat.

Then this miraculous thing happened.  Flipping through the October issue of bon appetit, I came across a recipe for green posole with cod and cilantro.  Brilliant, I thought, I can make this.  "Did you see this?" I called out excitedly, "We have cod! We can make this!"

"We don't have tomatillos," Fefe Noir, all sensible-kill-joy about her says, "and where will you find hominy?  What is hominy?"

Pffffffttt... details...

This year's garlic harvest chez The Moose
Curry Experience, curing in Fefe Noir's office.
This is a great recipe for November on Newfoundland's Avalon peninsula, as we are spiraling quickly toward the end of gardening season.  The garlic has been harvested and cured, the cilantro is still hanging on.  Peppers are finally ripe, or ripe-enough at least.  The first snow means we have had to give up on the vague hope that the tomatoes are going to ripen outside, so they have been brought in, green, to be hung to ripen, or stored in dark boxes, or made into jam and salsa and chutney.

I know, green tomatoes are not tomatillos, but they are bright with lemony-acidity which is a great base for a fish soup.  And sure, shallot season is over and I hadn't thought far enough ahead to buy some for storage but red onions are strong and juicy right now... and okay, the cilantro that is hanging on has gone to seed but the feathery green on the flower stalk tastes as much (maybe even more) of cilantro herb as the broad flat mid-summer leaf.  In the end I couldn't find hominy, but we had blanched and frozen a bit of local sweet corn.  Clam juice, too, is clearly for fancy people with fantasy grocery stores, but seafood stock is simple to make.

In the end, I'm pretty sure this is no longer a posole, but it is definitely a really good soup.  


13 May 2015

How to Make Pasta

This is an excellent kitchen basic to have in your repertoire... and an easy way to impress pretty much anyone.


Being able to make a basic pasta from scratch will serve you well in life.


Basic Egg Pasta, Hand-Made by You


Make a well in the flour for your eggs, salt and oil.
I've written the recipe on a per-egg basis because that's how I remember it. Also, it's easy to make as much or as little as you want.  As a point of reference, 3 eggs yield about 1 lb of fresh pasta (4 large or 6 small-ish servings).


for each egg:
100 g flour*
pinch of salt
1/2 tbsp extra virgin olive oil

Beat the wet ingredients together lightly.

*Use italian 00 flour if you have it but don't feel like you need it.  I normally use a mix of about half all-purpose and half durum semolina.  You can also use a mix of all-purpose with whole wheat or spelt flour.  Or just all-purpose.


Gradually work the flour into the egg mixture, scraping your
work surface as necessary.
Pile the flour up on your work surface** and make a well in the center of it. Fill the well with your eggs, salt and oil.  Using a fork, beat the egg mixture lightly, then begin to to gradually incorporate the flour into the egg mixture until it's too thick for stirring.  Work the remaining flour in with your hands.

**I use a large plastic serving tray, which is easier to clean than the counter and helps reduce the amount of flour which ends up on the floor, which is subsequently vacuumed up by Miss Bella the english springer hoover dog, which then results in great snorting and sneezing.  Somehow the discomfort of snorting and sneezing has never dissuaded her from spending the entire time I'm making pasta squished between my shins and the lower cupboard just in case some flour manages to fall.
When you get to this stage, your fork is no longer any good to
you.  Start kneading to finish incorporating the flours.

Knead the dough until smooth.  This will take about 9 minutes.  In the first couple of minutes, the dough will become evenly combined, then it will seize up.  You haven't done it wrong: knead through the stiffness, I promise it will relax and become pliable.

Cover the dough and let it rest for at least 25 minutes. This is a good time to make some sauce.
The dough is ready when you have kneaded the flours in,
kneaded until it seized, kneaded through the stiffness, and
ended up with a smooth, soft dough.  Let it rest before rolling.

If you are using a pasta roller, divide the dough into pieces about the size of an extra large egg.  Flatten and dust with flour to prevent sticking in the roller.  Run the dough through on the largest setting, fold over and run through again (dusting exterior with flour as needed) until it comes through smoothly.  Run through the same setting once more. Reduce roller setting by two sizes and run the dough through twice, dusting with flour if needed. 

Divide the dough into sections for rolling.
Continue to reduce roller size by two until desired thickness.  When rolling is completed, dust the pasta sheet generously with flour and set aside, covering if necessary to prevent drying out. Repeat with each section.

(If you are rolling by hand, divide the dough into manageable sized pieces for the size of your work surface and roll to desired thickness.)
Keep the dough well-floured to prevent sticking.

If the cutter that came from your pasta maker isn't broken because none of your cats knocked it onto the floor, use it to cut the desired width. 

If you don't have a working cutter, roll the well-floured sheets of pasta up and cut the desired width with a sharp knife.


~~~


This pasta freezes well, so you can make a large batch and freeze what you don't need.  Make sure it's well-floured to keep it from sticking together, but cook it directly from frozen (don't thaw) to avoid having damp flour glue the nicely separated pasta together.

When you are ready to cook, add pasta to a large pot of vigorously boiling water, stirring as you add to help keep things separated.  Fresh pasta will be cooked in 1-3 minutes (test as you go, it's done when it is firm and tastes fully cooked), depending on how thick and how wide it's cut.  From frozen it will take 2-4 minutes.


Roll the pasta sheets up into coils and use a very sharp knife to cut to desired width.  You can use this recipe for stuffed pasta and lasagna too, but follow recipe directions for cutting.


~~~


I do not have an Italian grandmother who taught me to make pasta, but I do have all the Italian grandmothers of the miracle of the internet.  Plus a few years of trial and error.  This recipe is a result of that, and for me, delivers the most consistently good results and disappointingly few dinner party leftovers.

Pasta making is a good skill to have.  No matter how good the pasta you buy in the store is, it's never as satisfying and never as impressive as the pasta you make by hand.  The pasta roller spends about as much time on the counter as the tortilla press, and it would be very difficult to decide between them which would be my desert island pick.***


***Okay, you are correct, the obvious answer is to take a rolling pin, but that's not much fun as a thought experiment, is it?


12 April 2015

I Like Moose Buns and I Cannot Lie

You don't have to braise all the indecipherable cuts of moose from the freezer.  Get your steamers ready, folks.


Steamed moose buns are a great bit of Canadian-Asian fusion to help us through the terrible Newfoundland season of winter-spring (@littleredchicken #StealingYourBonMots).  Great lunch or appetizer.  Even breakfast, why not?


Fefe's Steamed Moose Buns

inspired by The Woks of Life; dough adapted from AmyBites

This is a two day project.  Or an all day project.  Whichever way, it is time consuming. HOWEVER, you will end up making a massive supply of buns for your freezer.  The effort you put in up front will pay itself back in gold when you are wandering around the kitchen complaining that there's no food, only ingredients... but then you remember the moose buns.  In almost no time at all you'll be having the best lunch in town.

for the filling

The cat is generally less concerned about what cut this is.
1-1/2 lbs moose* (to yield a little more than 1-1/4 lbs after cleaning)
1-1/2 tbsp + 1 tbsp lard 
1/4 tsp salt
1 tbsp five spice powder
5-8 carrots (8 ordinary ones; Fefe only used 5 because two were "honking great things"), grated
6 spring onions, finely sliced
2 fresh chilies**, finely diced
1 tbsp soy sauce
4 tbsp mirin
If you live in a place where hot peppers are unpredictably
available, buy them when you can find them and toss any
you can't use right away into the freezer.  From frozen, you
can grate them into hot pepper snow with a microplane (or
just chop like you would fresh and carry on).
2 tbsp fish sauce
1 tbsp sesame oil
1 tbsp hoisin sauce
1 tbsp honey
1 tbsp white vinegar (if you haven't run out of rice vinegar like we did, use that!)

*if you don't have moose, you can substitute venison, goat or beef for a similar flavour, but then you have to call them Mock-Moose Buns...

**or BETTER, use frozen ones and grate them into hot chili snow with a microplane (we learned this trick from Jamie Oliver, it's brilliant)

for the dough

1-1/3 c milk
1/2 c butter
1/2 c sugar
2 tbsp water
3 tsp active dry yeast
2 eggs, beaten
6 c all-purpose flour

To make the filling, cut the moose away from the bone***, and clean it really well, removing all the gristle and as much fat as possible.  Mince by chopping really finely then blasting with a food processor or if you have such a thing as a meat grinder, go ahead and use it.  (If you have pre-ground meat, that's okay too.)

***DO NOT THROW AWAY THE BONES.  Use these to make some beautiful soup stock.


Clean the moose very well, chop finely and then blitz with
your food processor.  Or, if you are so lucky as to have a
meat grinder, use it.
Heat 1-1/2 tbsp lard in a skillet.  Brown the moose with the and five spice powder, then remove to a large heatproof bowl and set aside.  Add another 1 tbsp lard to the pan and saute the carrots, onion, and chilies until soft.  Add the carrot mixture to the moose and stir together with the remaining filling ingredients.
Make the filling a day ahead if you can.  If you have to make
it the same day, let it cool as much as possible before filling.

The colder the filling is, the easier it is to work with.  So if you can make it a day ahead and refrigerate overnight, do that.  Otherwise, cool it as well as possible.

To make the dough, heat the milk and butter together in a saucepan until the butter is melted.  Set aside.  Mix the yeast with water and let sit to soften, about 5 minutes.  When this 5 minutes is up, combine the milk mixture, yeast mixture, sugar and egg.

Sift the flour into a large mixing bowl (or the the bowl of a full sized food processor), reserving about a 1/4 cup in case you don't need it.  Slowly pour in the milk mixture, stirring constantly (or pulsing the food processor) until the dough comes together in a big sticky ball.  It should be sticky, but look like a ball... if it's shaggy, add more flour as needed.

Turn the dough out onto a floured surface and knead for about 5 minutes.  Put the dough in an oiled bowl, cover with a damp tea towel and let rise in a warm place for about an hour.


After the dough is risen, punch down and divide into quarters.  Work with one quarter at a time.  You have a lot of buns to make, this will help it be less overwhelming...

To stuff the moose buns, line 4 baking sheets with parchment (or some combination of baking sheets, serving trays and plates****).   Punch down the dough and divide into quarters.  Working with one quarter at a time (keeping the remaining dough covered), break dough into 12 fairly even pieces about the size of ping pong balls (so, a total of 48 buns by the time you are done with it).  Form each section into a ball, then roll into a circle about 1/4" thick.

****You will want freeze any uncooked buns for another day, so consider freezer safe-ness when choosing these.  Freeze them like you would berries or meatballs, in a single layer until frozen then transfer to a freezer bag or other airtight container. 


The trick is to get the right amount of moose filling.  Too
much and it will squish out the top; too little and you will
feel deprived.
Spoon some moose filling (about a tbsp) into the center of the dough. It's a matter of getting a feel for the ratio of filling to bun.  You want as much delicious moose stuffing as possible without risking not being able to close the dough up.  If you have the time and interest, you can spend a great deal of it looking at the miracle of the internet to find beautiful, intricate and traditional ways of folding up and sealing the bun.  Fefe simply draws up the edges and smooshes***** them together at the top.  Let the filled buns rest for 20-30 minutes before cooking or freezing.

*****That's the technical term, just ask her.

To cook the moose buns, prepare your steamer if necessary.  We make our stainless steel steaming basket non-stick by lining it with vented parchment.  Take a piece of parchment paper big enough to cover the bottom and sides of the steamer and cut it into a snowflake.  Bring a couple of inches of water in the bottom of your steaming pan to a boil, reduce heat to moderate the vigor of the boil but keep it high enough to have a good constant steam.


If you don't have a non-stick steamer, you can make it non-stick by lining it with a parchment paper snowflake.  This is a good job for the kids.


Gently place the buns in your steamer, leaving some space in between to allow for expansion.  Put the steamer over the boiling water, stick a tight-fitting lid on it, and cook for 12 minutes (15 minutes if cooking from frozen). The buns are done when the dough is expanded and soft but firm enough they don't hold a finger indentation.

Serve with sriracha or other garlicky hot sauce for dipping.


~~~

I started writing this blog post before Fefe finished making the moose buns.  She spent several minutes telling me how clever she was mixing half-batches of the dough in our teensy tiny mini-chopper that we pretend is as good as a full sized food processor.  I just heard her swear.  It seems the motor may be blown out.


What Fefe Noir did (left) was break the mini-chopper.  What worked better on the following recipe test (right), was to go old-school and use a bit of elbow grease.

~~~

Food supplies in grocery stores have been a bit unpredictable lately because it's been a hard year for ice... sea ice delays ferries and grocery shelves become empty.  Strangely, not just empty of exotic off-season foods like tomatoes and broccoli but also of ordinary things we can actually raise on this island, like pork and beef.  Meat has to come in from away because the big chain grocery stores won't carry meat that isn't inspected and graded and the only federally licensed slaughterhouse in Newfoundland and Labrador is for chicken.  I will admit to not fully understanding the problem, except to know that it's obvious something is broken.  I am not convinced that federally registered abattoirs is the answer; centralization increases the scale of contamination risk, drives up prices for the producer which can be a disincentive to raise livestock, and it can create a very troublesome gap between husbandry and slaughter.  Clearly, we need better support for agriculture in this province, from policy and from consumers in order to gain a scale of production that could reduce our dependence on that very unreliable chain of transportation.

But I digress.

Forget the beef, pork and Australian lamb marooned in the ice on the Cabot Strait.  The lack of meat on store shelves is only part of what has many of us digging to the bottom of our freezers and thawing out bits of ignored meat.  Like the goat we forgot we had, or that packet of moose that keeps getting put back after staring at it long enough to realize you haven't got the foggiest idea what part of the moose that was.  It's also nearing the end of winter.  We ate the easy stuff already.

This recipe makes a lot of steamed buns, but just freeze the
excess.  They cook from frozen in just 15 minutes when
you need a quick meal.
I know I say this every time we cook moose, but we have a lot of indecipherable cuts in the freezer. It seemed unlikely that the cast-off moose would include t-bone.  On the other hand, I hate to underestimate the generosity our friends and neighbours.  But probably blade roast cut like a steak?  With a slice of round? What do you call the picnic shoulder on a moose?

Here's some good news: you don't have to braise every uncertainty from the freezer. It's a good rule for unknown cuts, but you can also guarantee tenderness by mincing it.  And if you make something really delicious, you won't have to worry about maybe wasting a good steak.

These buns are a good project for April (or whatever time of year represents the dregs of winter where you live).  You won't really have time to make them once you start your outdoor-season projects, and you won't have to find something to fill an entire day or two consecutive afternoons once the weather improves.  Make them on a day when you are feeling stir crazy.  Cook them from frozen on days when it's taken you twice as long as expected to get home from work due to a late-season ice storm. Or when you are feeling listless from depression caused by the never-ending winter.

Serve the steamed moose buns with sriracha sauce, or other lovely garlicky hot sauce.  Mmmmmm.... 

8 February 2015

Freezer and Pantry Valentine: Part 1. The Appetizer

Make an impressive three course meal for two for Valentine's Day using ingredients you already have.  For the appetizer, smoke your own fish and make pickled berries.  (I told you it was impressive.)


Frozen fish, frozen berries and stale bread make a smoky and bright appetizer worthy serving to the love of your life.
Tea-smoked Cod Crostini

For the tea-smoked cod:

frozen cod*, thawed (as much or as little as you have**)

*Don't have cod?  Don't worry... use whatever other fish you have in the freezer. Allergic to fish? Tea-smoke a couple eggs (boiled for 6 minutes, peeled and cooled first), or pull something else out of the fridge or freezer.  You can tea-smoke just about anything, but consult the miracle of the internet for appropriate cooking times.

**As long as it fits on your smoking rack, see instructions below.  And bearing in mind this is for an appetizer for two, so you don't need very much... of course, any you don't use for Valentines day would be good on a sandwich or salad the next day.


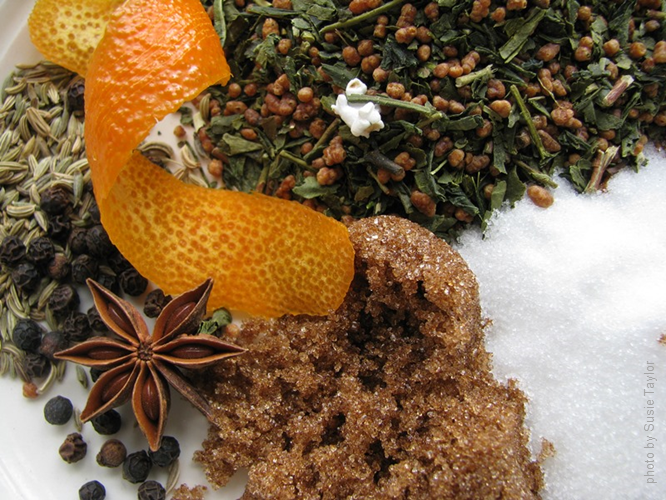
Genmaicha tea comes with the rice already in it, but feel
free to substitute any leafy tea and raw or toasted rice.

4 tbsp genmaicha tea (or 2 tbsp loose leaf green tea + 2 tbsp uncooked rice)

1 tbsp demerara sugar
1 tbsp granulated sugar
1 star anise
1/2 tsp fennel
1/2 tsp peppercorns
1 twist of orange

For serving:

a couple slices of stale bread
butter***
quick-pickled red currants****

***Or olive oil or bacon grease or drippings...

****Any berry from your freezer will do, the tarter the better.


MAKE AHEAD: You probably don't want to be running around like a crazy person feeling harassed and frustrated on Valentine's Day.  So make the smoked cod and the quick-pickled currants the day before.  We did a one-quarter-ish recipe of the Pickle Girl's recipe (link above) for the currants... and used the excess brine and pickled some wild blackberries to eat with cheese.

You need a heavy dutch oven or casserole or other pot with a lid.  You also need a good bit of aluminium foil and a heatproof rack that fits inside your pot.  We used our cast iron dutch oven and an old metal trivet with a bent leg (caribougrrl finally wins the why-are-we-keeping-all-this-useless-stuff game!).

When you see wisps of smoke rising from the tea mixture,
it's time to put the fish on.

Line your pan with tin foil in two directions, leaving a lot of overhang on all sides (enough to wrap the lid in later). Mix the tea, sugars, and spices together.  Spread these across the bottom of your foil-lined pan, add the orange peel, and place the rack over top.  Heat the smoking ingredients over medium-high until wisps of smoke begin to rise.  Put the fish on the rack in a single layer, put the lid on the pot, and wrap the lid with the overhanging foil.
Seal up the pot with tin foil turning it into a stove top smoker.


Let the fish smoke***** for about 12 minutes per inch of thickness.  You can tell if it's cooked the same way you would if you were baking or grilling it: the fish will be firm and fat will be coagulated on the surface.  White fish is delicate so remove it from the pan to cool rather than allowing it to cool in the smokey pan.

*****Your house is going to smell a bit smoky, but fragrant smoke, like incense.  Go ahead and run your exhaust fan, but there's a lot less smoke than you think, especially if you've used enough foil.  If you're still worried about it, take the whole pot outside when you open it up.


To serve:

Cut your stale bread into serving sized pieces.  For bonus points, cut it into heart shapes.  Butter (or oil or grease) lightly and fry in a skillet to toast.

Top toasts with flakes of smoked fish and a few pickled berries.  The bright and salty berries are the perfect counterpoint to the rich, smokey fish.


The tea-smoked cod is done when it's firm and flaky, and the fat has coagulated on the surface.

~~~

So, you might glean from the all the notes, that the important thing is not following the instructions exactly so much as using what you already have on-hand and following the idea.  Save your money for one good ingredient for your main or for a really good bottle of wine or for flowers, or (let's be honest) for your heating bill.  The point is, you can probably make something fantastic with things you already have sitting in your freezer and your cupboards.

About the tea-smoking.  We bought Skye Gyngell's A Year in my Kitchen several years ago and have always been tempted by the tea-smoking technique but really intimidated by it too.  When I saw the step-by-step in Showfoodchef's post about tea-smoked salmon, it all suddenly made sense and seemed accessible enough to try.  As it turns out, not only is tea-smoking possible, but it's surprisingly easy and surprisingly tidy.  Give it a try, you'll be amazed by yourself.

Stay tuned for a miniature version of a classic main, perfect for candle lit dinner.


13 June 2014

Stingin' in the Rain

Using the same chemical weapon as fire ants, there's something just a little Day-of-the-Triffids about stinging nettles.  But not to worry, they're only dangerous until you cook them.


Serve nettles cooked in red wine over fried polenta and top with some shaved parmesan.  A first course worth building a dinner party menu around.
Stinging Nettle and Polenta Starter

for the polenta

1 c. chicken stock
1 c. nettle tea (see below) or vegetable stock
generous pinch of salt
3/4 c. cornmeal
1/2 tbsp good quality olive oil
butter for pan-frying (bonus points for using your own hand-crafted butter!)


for the nettles

1 tbsp olive oil (or more or less to coat bottom of skillet)
1 clove garlic, minced
1 small shallot, thinly sliced
ground pepper to taste
salt to taste
1 dried red chili pepper, torn into pieces
1 c. blanched and drained stinging nettle leaves (see below), roughly chopped
1/4 c. red wine
1/4 c. nettle tea (see below) or water
Parmesan-Reggiano, shaved, to taste


Prepare the polenta at least 3 hours and up to 2 days ahead of time.  In a heavy-bottomed saucepan, heat the stock, nettle tea and salt over med-high heat until boiling.  Turn down to medium, but keep the liquid at a rolling boil and slowly pour cornmeal in, stirring constantly to prevent lumps.  Turn the heat down more if the polenta is sputtering.  Continue stirring until the cornmeal is cooked and the polenta is thick.  Remove from heat.  When the mixture is no longer bubbling, stir in the olive oil.  Pour into a square baking pan (glass, non-stick, or lightly oiled), spread to corners and level out.  Cover and refrigerate for at least 3 hours to set the polenta.

(Three hours, conveniently, is enough time to go back out to pick and process another batch of stinging nettles for the freezer.)
You can tell they're good for you just by looking at the rich green colour
of the blanched stinging nettles.  They taste good too.

Prep your nettle ingredients.  Cut the polenta into 4 squares and set aside. (Trim the outside for a more even edge, the scraps can be fried as a snack or to dip in soft-cooked eggs for breakfast...)

You do have at least two skillets, right? 

Put a generous pat of butter into the pan where you plan to fry the polenta.

In your other skillet (the one you have a lid for), heat olive oil over medium-high heat.  Saute garlic and shallot until softened.  Add black pepper, salt and hot pepper and saute for another minute.  Add nettles toss until fully covered in oil and slightly wilted (1-2 minutes). 

Turn the heat under your polenta pan to medium.

Add red wine to nettles and stir until liquid has evaporated.  Turn heat down to med-low, add nettle tea, cover and cook for 5-6 minutes.

While the nettles steam, fry your polenta squares.  When the butter in your polenta pan is thin and the foam is subsiding, add the squares of polenta.  Cook 2-3 minutes on each side until heated through.  They should have a thin golden brown crust.

Remove cover from nettles and allow any remaining liquid to evaporate.

To plate, top each polenta square with 1/4 of the nettle mixture, then artfully place shaved parmesan on top.  Serve as a first course.  (This would also make a good side dish for grilled salmon or lobster.)

Nettles have a very present yet delicate flavour but none of the bitterness that many wild greens have... their defense is stinging, so they don't need to taste bad to avoid being eaten.  While the flavour is not as strong as mature spinach, but the texture is much meatier.  


~~~

There is an enormous nettle patch a short diversion from one of our favourite coastal trails.  Getting ready to head out foraging, it felt a bit insane choosing to go out gathering food in the famous Newfoundland rain, drizzle and fog... especially knowing that when we returned, we'd be cold and damp and the dogs would inevitably smell like, well, wet dogs.


Bella and Sam are inevitably "helpful" when we're foraging.
To save them from their loyal and eager-to-please selves,
we tethered them away from the stinging nettle patch.
Bella was smart enough to take advantage of the tree and
get out of the rain.  Sam, on the other hand...
But if you always wait for perfect weather to go outside, you might rarely leave your house.  (Especially if live on an island in the North Atlantic.)  You'd miss out on the magic of being in water-saturated air... sure, it's wet, but the colour of the rocks and trees and birds is deeper and fuller and sound travels with more richness.  The reduced visibility makes the world a bit smaller and cozier.

As we were wading, drenched, through the knee-high patch of nettle, snapping of the tops of the plants, we heard the drone of an outboard motor halt.  It's funny how sometimes you only hear a noise because it stops.  The motor cut and was followed by the hollow thump-thump of lobster pots being checked.  The motor starts, then stops, thump-thump, thump-thump, repeat.  The rhythm of that work is very distinct to the ear and even though we both knew what we were listening to, we looked up anyway, because that's what you do.  

As though waiting for us to turn away from the nettles, a massive bald eagle suddenly flew close enough and low enough we could distinguish the yellowish-whites of its eyes.  An eagle beside us, a lobster boat below us, a couple of great big bags full of nettle... that's exactly why we were out in the rain instead of bundled up on the couch watching the new season of Orange is the New Black.


~~~


Identifying and handling stinging nettle (Urtica spp.)


Nettles tend to grow in patches and can often be spotted by the change
in texture they create.
Stinging nettle is most commonly found in disturbed and disused areas.  Old pastures, abandoned properties, gardens, the edges of your composter, fence lines...  it's also found on roadsides, but don't bother looking there, you don't want the contamination from exhaust fumes anyway.

The easiest way to identify a nettle is by touching it.  If you've ever walked through a patch of tall weeds when wearing short pants, only to find your legs prickling with fire, you've encountered stinging nettle.  The touch-method is not recommended.  Head out dressed for the job: long pants, long sleeves, gloves.

Since it was rain-drizzle-and-fogging the day we went out searching for nettle, in addition to pocketing a pair of rubberized gloves, I wore my rain suit.  Rain jacket, rain pants, rubber boots.  No matter that we've lived in rural Newfoundland for over 6 years, Fefe Noir's fashion rules irrationally exclude rain pants.  She refers to them as my "plastic trousers" and rolls her eyes at me whenever I put them on.  But who got the last laugh?  Not only did I stay dry, but as we were wading through a field of nettle, Fefe discovered that you can, indeed, be stung by nettle through a pair of jeans.

(But wait, between that handicap and her photo-taking duties, I ended up doing most of the actual harvesting...)


Stinging nettles are easily identified by touch, but try to avoid finding them that way.  Look for slender plants with large, toothed leaves in opposite pairs.  The stems and leaves are fuzzy from being covered in stinging hairs.

Nettles are tall plants with slender stems and paired leaves.  The leaves are broad but come to a definite point on the ends and the edges are toothed.  The leaves and stem are covered in tiny hairs.  The flowers are green-ish and hang in clusters, but you don't need to know that much: if it's already flowering, it's too late in the year (but write the location down somewhere so you can come back next year, earlier).


Wear rubberized gloves when you pick stinging nettle.
For older plants (over 20 cm high), snap off the top
15-20 cm only.
USE HEAVY RUBBERIZED GLOVES when you pick them.  Take the whole above-ground part of the plant if it is really young (less than 20 cm high); if the plant is older but not yet flowering, pick the top 15-20 cm.  A lot of people use scissors or garden shears for harvesting, but we found it awkward to hold kitchen scissors with our big rubberized gloves, so just broke the stem off with gloved fingers for efficiency's sake.

Once you're home and ready to process the nettles, keep your gloves on while you break off the top young leaves and pull the older leaves from the stem.  Toss the stems and rejected leaves (brown, moth-eaten, bruised) into your composter.  Blanch the nettle in saltwater to neutralize the sting, and squeeze the nettle tea from them.  Hank Shaw provides a very good description of processing stinging nettles, so I will direct you there rather than taking up unnecessary space.  Save the nettle tea for this recipe, or to use as a substitute for vegetable broth in all sorts of dishes.


Stingin' in the Rain on Punk Domestics

2 September 2013

Nasturtium Dolmades

Nasturtiums are one of the most versatile plants in your flower garden: they look pretty, you can eat the flowers and leaves raw in salads, you can pickle the buds and seed pods to make capers... and, as it happens, you can stuff the leaves to make dolmades.


Nasturtium Dolmades


inspired by Cafe Nilsen
and adapted from Madhur Jaffery's World-of-the-East Vegetarian Cooking

for the filling:

1/2 c. long grain rice
1/2 c. finely chopped herbs (we used a mix of parsley, mint and dill)
5 small spring onions, including greens, minced
1/8 c. pine nuts chopped
1/2 tsp salt
good grinding of black pepper

for wrapping:

15-20 of the largest nasturtium leaves in your garden
several large chard leaves... or whatever green you have in abundance and is looking moth-eaten; or if you have a mother of a crop of nasturtium with leaves to spare, a bunch of those... in any case, enough to line a small sauce pan*

for the steaming broth:

1/4 c. olive oil
1/4 c. fresh squeezed lemon juice
1 tsp sugar
3 garlic cloves, smashed
1/4 tsp salt
water (about 1/2 c., more as needed)

*choose your pan keeping this in mind: you need to be able to pack these tightly so they don't unroll when cooking, you also need to have a heatproof plate that fits inside the pan to weigh down the dolmades... you can layer the them but you cannot make a loosely packed pan tight... so choose the smallest pan you can get away with

Make the filling:  Bring 5 c. water to a boil, add the rice, return to boil and boil rapidly for 5 minutes.  Drain and rinse well under cold water.  Mix together with remaining filling ingredients, set aside.

Next we stuff the leaves. If you have PMS, a hangover, or are in a generally crooked mood, cover your filling and refrigerate and try again another day. If you are feeling happy and well-adjusted, or at least reasonably calm, feel free to proceed. 

Stuff the dolmades:  Line the bottom of your saucepan with leaves.  We used chard leaves because we had some old stringy chard in the garden; it's not important what sort of leaf you use, but the idea is to keep the dolmades from sticking to the bottom of the pan.  Lay a nasturtium leaf stem-side down; put a scant teaspoon of filling slightly lower than center.  If you use too much filling it will burst through the leaf during cooking, so yes, it doesn't look like a lot, but trust us, it's enough.  Gently fold the bottom of the leaf over the filling (about 1/4 of the way up, depending a bit where the filling landed); gently fold the left and right sides in.  Starting at the bottom, slowly and carefully roll up into a little package.  (See helpful diagram for stuffing and rolling the leaves.)  Place seam-side down in the pan.  Repeat until you are out of leaves, out of filling, or your pan is full.  Pack these in tightly to prevent unrolling during cooking.  You can have two layers if you need to.


Steam the dolmades:  BEFORE YOU PUT YOUR LIQUID IN, place your heatproof plate in the pan on top of your beautifully rolled dolmades to weigh them down.  Mix together ingredients for steaming broth; pour broth into pan over plate.  Over medium heat, bring to boil then cover and turn down to a simmer.  Cook on simmer for 1 hour.  Keep checking the pot: you want to steam these babies until the rice is cooked but you don't want to run out of liquid so add water if needed.  However, at the end of the hour, your liquid should be fully or mostly evaporated.

Cool and serve at room temperature or refrigerate and serve cold.


 ~~~

These dolmades taste just like the traditional stuffed vine leaves... but a little less vine-leafy-bitter and a little more nasturtium-leafy-spicy.  This is one of those dishes that, when we moved to Newfoundland, could not be found for love nor money.  If we wanted a dolma, we had to make it, which wasn't all that daunting because they were something Fefe Noir made on occasion for dinner parties and potlucks.  But  never mind finding dolmades at a restaurant or in a grocery store, back then you couldn't even buy the critical grape leaves except unpredictably at high-priced specialty stores.  

As far as we're aware, there is only one farmer in the province growing grapes, at a scale that sounds most probably for personal consumption or as a novelty crop... and clear across the island, so not very handy for trying to buy a couple dozen leaves.  These days, you can buy bottled grape leaves at the local grocery stores (in St. John's, anyway), and we sometimes do, but that's a winter purchase.  You can even buy tinned dolmades (which are rather handy for picnicking or camping) and I'm willing to bet they can be found in at least a few restaurants across the island.  At any rate, it turns out the grape leaf is entirely unnecessary if you're willing to make it up and make do with what's on-hand... in late summer when the nasturtiums in your garden are going like mad, collect some of those leaves and make a batch.