Showing posts with label seasonal food. Show all posts

8 November 2015

You say tomatillo, I say tomato...

Spiraling quickly toward the end of gardening season, here's a bright late-harvest recipe for before the dutch oven gets dusted off.


Maybe not technically a posole, but a fantastic green tomato fish chowder (garnished with the world's smallest radish).

North Atlantic End-of-Season Posole

adapted from bon appetit October 2015 issue

1-3/4 lbs green tomatoes
2 tbsp olive oil
1 red onion, minced
2 cloves garlic, smashed then minced
1 fresh hot peppers, thinly sliced
all the cilantro that survived the first snowfall (or 1 cup)
2 cod loin fillets*
kernels from 2 cobs of sweet corn**
2 cups seafood stock***
garnish for serving: sliced fresh hot pepper, radish, lime

*yeah, okay, cod loins vary in size, but use enough to serve a decent soup-amount to 4 people... a pound to a pound and a half will do

**blanch very fresh sweet corn in boiling water for 4 minutes then plunge in ice-cold water to stop the cooking process; using a sharp knife, cut the kernels off the cob... or use a heaping cup of frozen corn

***made from fish heads and/or shellfish shells (ours was in the freezer made some time ago, likely from shrimp heads and shells, maybe trout heads or lobster scraps too)


True, we had to substitute nearly every ingredient, but that's just the
cost of living on an island in a cold, harsh climate.
Wash and quarter the green tomatoes, removing the stem and any unsightly spots, bruises, frostbite, etc.  Puree in a food processor or blender and set aside.

In a heavy-bottomed saucepan, heat oil over medium.  Cook onion, garlic and hot pepper until soft.

Add half of the green tomato puree and cook until the mixture reaches a good steady boil.  Add cod, corn, and seafood stock.  Bring to a simmer and maintain it to poach the cod until it is cooked through, about 8-10 minutes.

While the cod is cooking, roughly chop the cilantro and add to remaining green tomato.  Puree together.

When the cod is cooked, remove soup from heat and stir the green tomato mixture to incorporate, breaking the cod into chunks.  

Ladle into bowls, garnish with hot pepper slices and radish and squeeze a bit of lime juice over top.  

Serves 6 as a first course or 4 as a light meal.

~~~

Whenever we buy a gourmet cooking magazine, we excitedly scan the pages.  Ooooohing and ahhhhing.  Imagining a dinner party.  Looking up ingredients that are probably readily available in major cities but impossible to find on this island in the North Atlantic. Or at least impossible to find all at the same time.  (We fantasize constantly about grocery stores that you can walk into with a list and walk out of with everything ticked off.) 

It's possible there is some sort of psychotic disorder that makes us buy these magazines over and over again.  Taunting ourselves with them.  Salivating over meals we'll never eat.

Then this miraculous thing happened.  Flipping through the October issue of bon appetit, I came across a recipe for green posole with cod and cilantro.  Brilliant, I thought, I can make this.  "Did you see this?" I called out excitedly, "We have cod! We can make this!"

"We don't have tomatillos," Fefe Noir, all sensible-kill-joy about her says, "and where will you find hominy?  What is hominy?"

Pffffffttt... details...

This year's garlic harvest chez The Moose
Curry Experience, curing in Fefe Noir's office.
This is a great recipe for November on Newfoundland's Avalon peninsula, as we are spiraling quickly toward the end of gardening season.  The garlic has been harvested and cured, the cilantro is still hanging on.  Peppers are finally ripe, or ripe-enough at least.  The first snow means we have had to give up on the vague hope that the tomatoes are going to ripen outside, so they have been brought in, green, to be hung to ripen, or stored in dark boxes, or made into jam and salsa and chutney.

I know, green tomatoes are not tomatillos, but they are bright with lemony-acidity which is a great base for a fish soup.  And sure, shallot season is over and I hadn't thought far enough ahead to buy some for storage but red onions are strong and juicy right now... and okay, the cilantro that is hanging on has gone to seed but the feathery green on the flower stalk tastes as much (maybe even more) of cilantro herb as the broad flat mid-summer leaf.  In the end I couldn't find hominy, but we had blanched and frozen a bit of local sweet corn.  Clam juice, too, is clearly for fancy people with fantasy grocery stores, but seafood stock is simple to make.

In the end, I'm pretty sure this is no longer a posole, but it is definitely a really good soup.  


26 June 2015

Rhubarb Catch-Up

Summer has been so slow to get going, it seems the only thing growing out in the back yard is rhubarb.  Strangely, it's doing so well we can hardly use it all.  So to catch up, we made ketchup.


Rhubarb ketchup is a thing of great beauty.  It looks good, it tastes good, and it's a great way to use the big old fibrous stalks that you left too long to reasonably use in a pie...


Hot and Sour Rhubarb Ketchup

loosely adapted from Marguerite Patten's ketchup recipes

1-1/2 lb chopped rhubarb stalks
2 sweet white onions, diced
2 c water
1/2 c raw cane sugar + more to taste
3 cloves garlic, crushed
3 thai chili peppers, stemmed and split
1 tbsp fish sauce
2 c spiced vinegar (see below)

Combine the rhubarb, onion, water, sugar, garlic and hot peppers in a large sauce pan.  Bring to a boil.  Stir well to make sure all the sugar is dissolved, then turn down and simmer until the rhubarb and onions are soft.   

Puree the mixture with an immersion blender (or in batches in a regular blender, or run it through a food mill) and return to the stove.  Simmer until reduced to thick sauce.  

Stir in the fish sauce and spiced vinegar.  Taste it; add more sugar if needed or otherwise adjust your seasoning.  Simmer until desired ketchup-thickness.

Transfer to a clean jar or bottle and store in the refrigerator.   Alternatively, you can fill sterile jars with hot ketchup and heat process for 10 minutes, saving the fridge space.


Don't have cheesecloth around to tie those spices up in? Don't
worry.  Infuse the vinegar then strain them out.
Spiced Vinegar

2 c white vinegar (5% acetic acid)
1 tsp fennel seed
1 tsp whole cloves
1 tsp broken-up star anise
1 cinnamon stick

Put everything in a saucepan with a lid.  Heat over medium until it comes to a boil then remove from heat.  Leave, covered, for at least 2 hours to infuse the vinegar.  Strain through a sieve when you are ready to use.


~~~

Marguerite Patten died recently, at the age of 99.  I can't help but figure she had something right about cooking and eating to have made that far.  

I didn't know anything about Patten before I met Fefe Noir and her ever-increasing collection of old British cookbooks.  What we have of Patten's (handed down from her mother and carefully protected in resealable bags so that the loose pages don't get lost) only scratches the surface of her bibliography, but they are well used -- as much for technique and inspiration as for actual recipes.  If nothing else, I owe her a great debt of gratitude for giving me permission to make ketchup out of things that aren't tomatoes.*

*I grew up in Heinz country.  Literally in the midst of tomato fields that fed the local factory which produced ketchup from 1910 until it closed in 2014.  I was reared on Heinz ketchup** so the idea that ketchup is made, always, from tomatoes was just woven into me.

**Well, okay, if we bought ketchup, it was Heinz, but mom did make her own ketchup.  From tomatoes.

This is what I love about Marguerite Patten: she is full of solutions.  I tore the kitchen apart looking for cheesecloth to tie all my spices in a bundle for simmering with the rhubarb.  As I was puzzling how I was going to get my spice mix infused through the ketchup I happen to notice that some of Patten's recipes used spiced vinegar, not a spice sachet.  Whoa-ho, then!  What a fantastic solution.  Infuse the vinegar and stir it in later.  Brilliant.

There is no recipe in her book for rhubarb ketchup, and certainly no recipe with thai chilies and star anise.  But she is very reliable about the proportions of fruit to sugar to vinegar.  So when we found ourselves with a glut of rhubarb (the opposite problem to what we faced a couple years ago), the obvious plan of attack was to pull the 500 Recipes: Jams, Pickles, Chutneys off the shelf.


~~~


Hot and sour rhubarb ketchup is fancy, but it's not snobby.  Served here with  grilled cheese made with sprouted grain sourdough bread from Rocket Bakery and smoked cheddar cheese from Five Brothers Artisan Cheese purchased at Admiral's Market.  Er, okay, maybe a little bit snobby...


Oh and by the way, you really want to make this ketchup.  Working on the recipe I knew we hit it when, tasting a batch, I immediately thought, "this would go really well with cava!".  Which means it would go really well with champagne... and there's your excuse to have champagne with your french fries.  The good news is that although you can serve it to your snobby friends, it's not really a snobby ketchup: also goes well with burgers and beer.   


30 December 2014

The Most Wonderful Time of the Year

Sangria is one of the most delicious drinks of the holiday season.  Use white wine for a crisp, new-years-y feel.  


White wine sangria makes a great signature drink for your holiday cocktail party: fresh, crisp, boozy, and you can make the mix the day ahead.  Added bonus: fights scurvy...

Make-Ahead White Sangria Mix for your Holiday Party

Take advantage of the peak of citrus season and use fresh-
squeezed ingredients.

Get the mix ready the day before or the morning of your party.  

1 meyer lemon, sliced
1 lime, sliced
2 clementines, sliced
4 oz brandy
juice of 1-1/2 meyer lemons, 1 lime, 3 clementines

Put the sliced fruit in a pint-sized mason jar.  Add the brandy then top with the citrus juices.  This should almost exactly fill the jar.  Make up one jar of mix for each bottle of wine you anticipate turning into sangria.

Take a moment to marvel at how beautiful those jars of citrus fruit look, then put them in the fridge until you are ready to use.  (If it's a cold enough winter, you might be able to store them in your shed or a closed in porch... if you aren't sure, don't take the chance.)
~~~
Each pint-sized mason jar of citrus-brandy mix will do one 750 mL bottle of wine.  Use the jar to measure your sparkling lemonade, mix it all together and illico presto, you have sangria.

White Wine Sangria Instructions


Make sangria in a pitcher or punch bowl (depending on the size of your party and your aesthetic sensibility) with ice.  Since it's all pre-measured, you can start with as much as you want and easily top it up as needed. For each jar of sangria mix add:

1 bottle of crisp and bright white wine (like sauvignon blanc or pinot grigio)
2 cups* of decent sparkling lemonade**

*don't bother with a measuring cup, just fill your empty mix jar to the neck
**this saves you from having to make a syrup and figure out the right ratio of syrup to soda water, and still lets you avoid the HFCS pitfall of most soda pop 

...give it a stir and you're on! 
~~~

[Hi, Mom!  You can skip this paragraph, I won't be offended...]  A million years ago when we were undergrads living in a student apartment with a then-new-friend who is a now-old-friend, we had the occasional sangria party: everyone brought a bottle of cheap red wine and piece of fruit.  A big bucket was filled with the various wines of suspect origin, some cheap brandy or maybe whisky (or whatever was handy) was tipped in, grapefruit-ish Wink soda to dilute and sweeten, and masses of uncoordinated fruit were chopped and tossed in for good measure.  When the sangria ran out and the fruit mostly consumed, anyone left standing was likely to go out for breakfast.  This bucket-of-sangria fun, I must point out, was started by previous tenants of that apartment long before we moved in... a tradition that was inherited with the apartment.  A tradition that should undoubtedly stay with the apartment, because anyone over the age of 25 is probably not immortal enough for the consequences of such an event.

If I recall correctly, sangria parties were generally spring events, something to help shake off the long cold winter.  So for the longest time, I thought of sangria as a spring or summer drink.  Bubbles, fruit, ice... what's not summery about that? 

But, lo and behold, I was wrong.  

A few years ago, I was talking warm weather drinks with a Portuguese-immigrant friend who found it amusing that I associated sangria with summer because, so far as she is concerned, sangria is for Christmas.  What an epiphany!  Even without thinking too hard about it, I am happy to defer to the Portuguese on this.  

But think about it anyway: of course sangria is a Christmas drink.  Citrus is available year-round, but December is when it’s at its peak season.  It’s the time of year we buy crate after crate of clementines and the end of the season for boxes of mandarins wrapped in thick purple paper.  Meyer lemons and early blood oranges appear on the shelves, limes become so inexpensive you can buy them in dozens without having a panic attack at the till, and heavy boxes of grapefruit pre-ordered as fundraisers for school bands finally materialize.  It’s the most wonderful time of the year indeed.

So make sangria during the holiday season.  (In a pitcher or punch bowl.  No buckets.***)

***Unless, of course, you are a student... 

And a happy new year!

The advantage of fresh but pre-measured sangria mix could become abundantly clear as
the evening progresses... 

10 August 2014

Newfound-Ceviche

We're at the tail end of the summer food fishery.  Put away your pans and deep fryers and let the last of your fresh cod cook itself in the refrigerator.


In this ceviche, the cod and scallop are cooked by the acid in the liquid.  That means you don't have to heat up your kitchen; a bonus during the dog days of summer.


Cod & Scallop Ceviche


1/2 lb fresh or thawed cod, chopped coarsely
1/2 lb fresh or thawed scallops, chopped coarsely*
3-5 cloves garlic, smashed and coarsely chopped
2-5 (or more) hot red peppers, cut in half lengthwise
1-1/2 c. chopped fresh cilantro
1 tsp coarse sea salt
4 limes, juiced
1/2 grapefruit, juiced
Use sea salt in this recipe because, well, the sea is where
the star ingredients come from.
2 tbsp silver tequila
Use glass or other non-reactive material.  Jars work well
because the high sides help reduce the amount of citrus
juice required to cover everything.

*if you use tiny bay scallops, don't bother chopping

Once all the prep work is done, this recipe is dead simple.

In a clean 1 litre glass jar** spread 1/5 of the cilantro, garlic and peppers over the bottom.  Top with 1/4 of the cod and scallops.  Add another layer of cilantro, garlic and peppers and 1/4 tsp of salt.  Continue to layer the fish and seasonings, ending with a seasoning layer.

**or use a glass bowl but you may need additional citrus juice to cover the fish; the tall narrowness of a jar helps minimize the amount of juice required... and with the price of limes this year, it's a definite advantage


Use a spoon handle or knife along the edges of the jar to
release pockets and bubbles of air.
Mix the lime and grapefruit juice with the tequila.  Pour into the jar.  This will cover or nearly cover your fish. Run a knife or spoon handle around the edge of the jar to release air bubbles.  If the fish mixture is not completely covered in liquid, add more lime juice.

Cover and refrigerate for 12-36 hours.  Check that the fish and scallops are opaque right through before serving (if not opaque, return to fridge for a few more hours).  How quickly the ceviche will cure depends on how cold your fridge is, how acidic your citrus fruit was, and how big your coarse chopping is.

Use a fork or slotted spoon to remover from jar and serve on grilled sweet potato slices (see below).

Reserve the curing liquid and mix it into fresh salsa the next day.


Grilled Sweet Potato Rounds


sweet potatoes 
drizzle of sunflower oil
pinch or two of salt


Discovering that sweet potato can be cooked directly on
the grill was a culinary epiphany of the best sort.
Pre-heat your grill scorching hot.

Slice sweet potatoes into 1/4" thick rounds.  Toss with oil and salt.

Put sweet potato rounds directly on the grill in a single layer and immediately turn the grill down to medium heat.  If you have a charcoal grill or are using a griddle, use your own judgement with how to manage this shift in heat, I have no advice.

Cook for 4-6 minutes on each side.  You want the outside to blister and char a bit and the potato to cook through.  Salt lightly as you take them off the grill.

These are perfect as a base for ceviche, but are also good as a side for pretty much anything (and a simple but seriously delicious way to get your orange vegetable for the day).


~~~


Although this is not exactly an authentic recipe, it's inspired by the Peruvian style of ceviche with hot peppers and served with sweet potato.  It's best with sweet potato, but grilled avocado will also do in a pinch...
~~~

Summer in Newfoundland is always busy.  For starters, you can never be sure how much of it you'll get, so as soon as the weather turns you drop everything else and concentrate on summer: coaxing food out of the back garden, outdoor house projects... running, cycling or hiking without multiple layers, driving with the windows down, synthesizing vitamin D... turning the heat off in the house (at least during the day), whale watching, cocktails on the porch... and most importantly, after months of complaining about the cold and the damp and the unfairness of it all, finally taking a deep breath and saying, "it's too damned hot".

The other thing about Newfoundland summer is that, as astounding as it may seem for the foggiest place on earth, this island in the north Atlantic is something of a vacation destination.  Some years, before you know it, you are blocked solid with visitors.***

***Now don't take that as a complaint.  Visitors give us the excuse to do touristy things and the opportunity to show off some of the off-the-beaten-path secrets of this place.  And conscripting house guests to a work-for-your-food scheme**** resulted in speedy progress on The Fence Project, a good start on The Window Restoration Project, and knocking a bunch of items off the Round-To-It List.

****That sounds a bit cruel, I suppose, but in the interest of full disclosure, these particular guests insisted they wanted a project to work on... 

This has been a Summer of Visitors, thus a summer of especially good food.  (We can't have it be said that anyone ate poorly chez The Moose Curry Experience.)  It's been tricky though, since the fish truck that used to live across the harbour closed a couple years ago and the fish truck we stumbled across last year did not reappear this spring.  We were scrambling to find seafood closer to home than St. John's*****.  After many driving excursions wild goose chases, a failure of the power of social media, and some disappointingly not-as-fresh-as-it-should-be purchases from big chain groceries, we finally found a place hiding right under our noses.  Some good old fashioned postering brought the recently opened Admiral's Market to our attention.  If you're in Conception Bay North, you can find them in the boat-shaped building at the southside marina in Harbour Grace.  Both the scallops and the cod used in this dish were bought from the fabulous women who run the market.


Fresh cod and fresh scallops were bought locally from Admirals Market.
*****There are some good fish shops in St. John's and since I work there, it's not always inconvenient, but it means not being able to decide on a holiday or Saturday that it feels like a mussel night... plus, there's something nice about being able to spend your money in the community where you live.

To be frank, I was hoping to write a blog post about catching our own cod during the food fishery.  But that's a one-that-got-away story.  Er, a one that never bit story.  (Anyone who wants to help improve some mainlander jigging skills in September should leave a comment or send an email to the.moose.curry.experienceATgmail.com!)

Although the cod fishing was a bust, it's been a Summer of Perfect Cilantro.  Serendipitiously, Fefe Noir had the foresight to order several pounds of coriander seed this year and sow it in the bed where we buried the not-quite-composted bits from the old composter.  As a result, we have a serious bumper crop of cilantro.  Despite the unbearable heat (for those of you who will take pleasure in mocking our weather intolerance, we had about 3 weeks in the mid-high 20C range), there was no massive bolting event.  


Our cilantro crop is phenomenal this year.  Too bad none of our guests were as enthusiastic about it as we are...

An amazing cilantro year.  And five or six weeks of guests who don't particularly like cilantro.  Or very hot peppers.  Or very much raw garlic.

So as soon as the house was empty we started chopping... 


27 June 2014

Spruce up Your Gravlax

A recipe so smart, you'd be foolish not to try it.

Foraged spruce tips and juniper berries were used to flavour the salt cure for this gravlax recipe.


Spruce and Juniper Scented Gravlax

2 tbsp young spruce buds
6 wild juniper berries
1 + 1 tbsp coarse sea salt
2 tbsp granulated sugar
salmon, filleted, skin-on* 
2 tbsp local vodka (we used vodka made with iceberg water)

*this recipe is good for up to 2 lbs of salmon, but it's easy to scale up or down as needed.  Also, you will want either 2 fairly even-sized pieces or a large piece that can be cut into 2 more-or-less equal-sized bits.  For frugal gravlax, buy the cheaper tail end fillets.  If you go to an independent local fish monger (like The Fish Depot in downtown St. John's) and tell them what you are planning to do, they will help you find the right piece of fish.


Grind the spruce tips and juniper berries with half the salt.
In a spice grinder (or using a mortar and pestle) grind together spruce buds, juniper berries and 1 tbsp of the sea salt to a fine powder.  Combine with remaining coarse salt and sugar.

Spread the curing mixture over the salmon, but do not rub in.
If your fish is in one piece, cut it in half.  Spread a large piece of plastic wrap over your work surface and place the fish on it, skin side down.  Lightly spread a thick layer of the spice and salt mix over the fish (don't rub!).  Get one hand under one piece of fish.  Working quickly, pour the vodka over the other piece of fish and turn the dry piece onto it.  Wrap tightly in the plastic wrap**.

**if you are hopelessly inept with plastic wrap, make sure you have a friend on-site who can do the wrapping for you... it's important to get it closed up tight to contain the vodka quickly

Once the salmon is wrapped, use a heavy flat stone (or
weighted plate) to press the fish during curing.  
At this point, take a deep breath and look at your packet to make sure you've followed the instructions:  you should have spice and salt mix sandwiched between two pieces of salmon; the salmon should be flesh-to-flesh with the skin out.  There will be liquid all over the place inside the plastic wrap.  Good?  Good.  Put that packet into a plastic zipper bag, squeezing out the air as you seal it.

Put the salmon on a flat plate or platter or tray.  Put a flat, heavy, gravlax stone on top of it***.  Refrigerate for 3 days to cure the salmon, turning it twice a day when you feed your dogs****.

***You don't have a gravlax stone???  You can top the salmon with another flat plate and weigh the plate down with a brick or stone or large jar of pickles.

****You don't feed your dogs twice a day?  What do you mean you don't even have dogs?  We flip gravlax (and rinse sprouts, change salt cod soaking water, and do other things that need to be done twice a day) at 5 am and 5 pm.  You don't necessarily need to get up with caribougrrl to make gravlax... just remember to flip it over about every 12 hours.

After 3 days, remove the gravlax from it's packaging and rinse under cold water.  Pat dry gently with clean kitchen towel (or paper towels).  Store in an airtight container in the fridge. (If it lasts long enough without being eaten, this will store for a week or two according to the varying advice on the miracle of the internet.)

To serve, use a sharp knife to separate from the skin and slice thinly.  Eat on open-face sandwiches of rye bread or rye crackers, with mustard and yogurt sauce, and dandelion capers.  Or on bagels with cream cheese... on sandwiches, salads, pizza, pasta...


One of our favourite ways to eat gravlax is thinly sliced on rye crackers with mustard sauce and dandelion capers.


~~~

Anyone who's had good salmon sashimi can verify that fresh raw salmon is soft and buttery and beautiful as-is.  Salt-curing salmon concentrates and intensifies those qualities, extends the shelf life of the fish, and turns the salmon from a wholesome to a jeweled pink.  It looks almost too opulent to eat.  

I can't find a specific scientific paper or pop science article to back this up, but I once heard a radio program about the benefits of green space and being outside in the wilderness.  The thing that stuck in my mind from that radio show was that walking through coniferous forest is especially good for you.  Specifically, that inhaling the scent of spruce and pine improves cognitive function.

Which means the smell of spruce -- and by extension I will assume the taste, because it's all the olfactory system anyway -- is good for your brain.  And we've known for a long time that fish is brain food. So with all the appropriate warnings about unscientific and unsubstantiated claims: eating spruce-cured salmon will make you smarter.

~~~

Identifying and Harvesting Spruce Tips and Juniper Berries in the Rain****

****this also works on not-rainy days...


We took the dogs with us on a rainy day foraging trip.  Bella was not convinced spruce tips were edible, but found that a good spruce branch makes a passable umbrella.

Spruce and juniper are both conifers, but spruce are all tall and up-righty, while juniper are more of a prickly woody ground cover.


Spruce

Spruce is a short-needled coniferous tree, with tough (i.e. prickly) needles
spiralling around the branches. The needles are round and will roll easily
between your fingers.

The species of spruce you harvest makes no difference.  From a safety perspective, it's not even vital in the boreal forest that you can distinguish spruce from pine, larch and fir since the young tips from all of them can be used as a seasoning.  Nonetheless, there are differences in scent and therefore differences in flavour, so you may as well learn to tell them apart.

Pine trees have LONG needles in clusters of 2-5.  When you think a Group Of Seven painting, it's probably a pine tree you have featured in your mind.  They are the charismatic ones.

Larch (also called tamarack, called juniper in Newfoundland, just to be confusing) have short needles found in clusters, like tufts.  They lose their needles every year, so all the needles you see are young-of-the-year.  (Yes, I did just tell you about a deciduous conifer, feel free to call your grade 3 teacher and pass on that tidbit.)

Fir trees have short flat needles which grow along the length of the branch... if you look closely, they are in opposite pairs.  You cannot easily roll the needles between your fingers, though I'm sure some cheeky teenager would show you it can be done.

Spruce, then.  Spruce trees have short needles spiralled along the length of the branch.  The needles roll easily between your fingers.  This is the tree you are looking for for this recipe.


Spruce tips are the soft new bright green growth on the tree.  When the buds are swelling enough to break through the paper, they are ready to pick.
The young-of-the-year needles on spruce are bright green and soft.  Early enough in the year, they will still have a papery cap on them.  If you are picking spruce tips for pickling or other applications where you want them to stay whole, choose swollen tips that still have paper.  If you are using them as a spice, go ahead and harvest them any time before they harden up and get dark.

When you pick them, take a few from here and a few from there... you are pruning the tree, so be respectful of it.


Juniper Berries

Juniper is a low-growing evergreen with needles.  Juniper berries are actually cones, it's just that the cone scales are fleshy and merged together, making it look like a berry.  The best way to find the berries is to lift a branch of juniper up and look under it.


Look underneath the juniper branches for the berry-like cones.  The ripe
ones are sometimes quite dry and shrivelled in the spring but rub it
between your fingers: if it has some scent, use it.
Juniper berries take 1-3 years to mature, and birds apparently love the ripe ones, so chances are good any juniper you investigate will have many more green berries than blue ones.  In the spring, the ripe blue juniper berries are drier and less fragrant than they were in the fall, so you need more of them this time of year.  Roll them gently between your fingers and if there's any scent to them, they will work.  If they are dry and shrivelled and have no scent, it's probably not worth using. 

You might have heard that juniper berries are toxic, and I would suggest that eating handfuls of juniper berries is not a good idea.  As a spice or seasoning, however, there is no reason to be alarmed.  (With the usual caveats that if you are pregnant or have serious health concerns, you might want to leave them out of the recipe.)

Spruce and Juniper Scented Gravlax on Punk Domestics

13 June 2014

Stingin' in the Rain

Using the same chemical weapon as fire ants, there's something just a little Day-of-the-Triffids about stinging nettles.  But not to worry, they're only dangerous until you cook them.


Serve nettles cooked in red wine over fried polenta and top with some shaved parmesan.  A first course worth building a dinner party menu around.
Stinging Nettle and Polenta Starter

for the polenta

1 c. chicken stock
1 c. nettle tea (see below) or vegetable stock
generous pinch of salt
3/4 c. cornmeal
1/2 tbsp good quality olive oil
butter for pan-frying (bonus points for using your own hand-crafted butter!)


for the nettles

1 tbsp olive oil (or more or less to coat bottom of skillet)
1 clove garlic, minced
1 small shallot, thinly sliced
ground pepper to taste
salt to taste
1 dried red chili pepper, torn into pieces
1 c. blanched and drained stinging nettle leaves (see below), roughly chopped
1/4 c. red wine
1/4 c. nettle tea (see below) or water
Parmesan-Reggiano, shaved, to taste


Prepare the polenta at least 3 hours and up to 2 days ahead of time.  In a heavy-bottomed saucepan, heat the stock, nettle tea and salt over med-high heat until boiling.  Turn down to medium, but keep the liquid at a rolling boil and slowly pour cornmeal in, stirring constantly to prevent lumps.  Turn the heat down more if the polenta is sputtering.  Continue stirring until the cornmeal is cooked and the polenta is thick.  Remove from heat.  When the mixture is no longer bubbling, stir in the olive oil.  Pour into a square baking pan (glass, non-stick, or lightly oiled), spread to corners and level out.  Cover and refrigerate for at least 3 hours to set the polenta.

(Three hours, conveniently, is enough time to go back out to pick and process another batch of stinging nettles for the freezer.)
You can tell they're good for you just by looking at the rich green colour
of the blanched stinging nettles.  They taste good too.

Prep your nettle ingredients.  Cut the polenta into 4 squares and set aside. (Trim the outside for a more even edge, the scraps can be fried as a snack or to dip in soft-cooked eggs for breakfast...)

You do have at least two skillets, right? 

Put a generous pat of butter into the pan where you plan to fry the polenta.

In your other skillet (the one you have a lid for), heat olive oil over medium-high heat.  Saute garlic and shallot until softened.  Add black pepper, salt and hot pepper and saute for another minute.  Add nettles toss until fully covered in oil and slightly wilted (1-2 minutes). 

Turn the heat under your polenta pan to medium.

Add red wine to nettles and stir until liquid has evaporated.  Turn heat down to med-low, add nettle tea, cover and cook for 5-6 minutes.

While the nettles steam, fry your polenta squares.  When the butter in your polenta pan is thin and the foam is subsiding, add the squares of polenta.  Cook 2-3 minutes on each side until heated through.  They should have a thin golden brown crust.

Remove cover from nettles and allow any remaining liquid to evaporate.

To plate, top each polenta square with 1/4 of the nettle mixture, then artfully place shaved parmesan on top.  Serve as a first course.  (This would also make a good side dish for grilled salmon or lobster.)

Nettles have a very present yet delicate flavour but none of the bitterness that many wild greens have... their defense is stinging, so they don't need to taste bad to avoid being eaten.  While the flavour is not as strong as mature spinach, but the texture is much meatier.  


~~~

There is an enormous nettle patch a short diversion from one of our favourite coastal trails.  Getting ready to head out foraging, it felt a bit insane choosing to go out gathering food in the famous Newfoundland rain, drizzle and fog... especially knowing that when we returned, we'd be cold and damp and the dogs would inevitably smell like, well, wet dogs.


Bella and Sam are inevitably "helpful" when we're foraging.
To save them from their loyal and eager-to-please selves,
we tethered them away from the stinging nettle patch.
Bella was smart enough to take advantage of the tree and
get out of the rain.  Sam, on the other hand...
But if you always wait for perfect weather to go outside, you might rarely leave your house.  (Especially if live on an island in the North Atlantic.)  You'd miss out on the magic of being in water-saturated air... sure, it's wet, but the colour of the rocks and trees and birds is deeper and fuller and sound travels with more richness.  The reduced visibility makes the world a bit smaller and cozier.

As we were wading, drenched, through the knee-high patch of nettle, snapping of the tops of the plants, we heard the drone of an outboard motor halt.  It's funny how sometimes you only hear a noise because it stops.  The motor cut and was followed by the hollow thump-thump of lobster pots being checked.  The motor starts, then stops, thump-thump, thump-thump, repeat.  The rhythm of that work is very distinct to the ear and even though we both knew what we were listening to, we looked up anyway, because that's what you do.  

As though waiting for us to turn away from the nettles, a massive bald eagle suddenly flew close enough and low enough we could distinguish the yellowish-whites of its eyes.  An eagle beside us, a lobster boat below us, a couple of great big bags full of nettle... that's exactly why we were out in the rain instead of bundled up on the couch watching the new season of Orange is the New Black.


~~~


Identifying and handling stinging nettle (Urtica spp.)


Nettles tend to grow in patches and can often be spotted by the change
in texture they create.
Stinging nettle is most commonly found in disturbed and disused areas.  Old pastures, abandoned properties, gardens, the edges of your composter, fence lines...  it's also found on roadsides, but don't bother looking there, you don't want the contamination from exhaust fumes anyway.

The easiest way to identify a nettle is by touching it.  If you've ever walked through a patch of tall weeds when wearing short pants, only to find your legs prickling with fire, you've encountered stinging nettle.  The touch-method is not recommended.  Head out dressed for the job: long pants, long sleeves, gloves.

Since it was rain-drizzle-and-fogging the day we went out searching for nettle, in addition to pocketing a pair of rubberized gloves, I wore my rain suit.  Rain jacket, rain pants, rubber boots.  No matter that we've lived in rural Newfoundland for over 6 years, Fefe Noir's fashion rules irrationally exclude rain pants.  She refers to them as my "plastic trousers" and rolls her eyes at me whenever I put them on.  But who got the last laugh?  Not only did I stay dry, but as we were wading through a field of nettle, Fefe discovered that you can, indeed, be stung by nettle through a pair of jeans.

(But wait, between that handicap and her photo-taking duties, I ended up doing most of the actual harvesting...)


Stinging nettles are easily identified by touch, but try to avoid finding them that way.  Look for slender plants with large, toothed leaves in opposite pairs.  The stems and leaves are fuzzy from being covered in stinging hairs.

Nettles are tall plants with slender stems and paired leaves.  The leaves are broad but come to a definite point on the ends and the edges are toothed.  The leaves and stem are covered in tiny hairs.  The flowers are green-ish and hang in clusters, but you don't need to know that much: if it's already flowering, it's too late in the year (but write the location down somewhere so you can come back next year, earlier).


Wear rubberized gloves when you pick stinging nettle.
For older plants (over 20 cm high), snap off the top
15-20 cm only.
USE HEAVY RUBBERIZED GLOVES when you pick them.  Take the whole above-ground part of the plant if it is really young (less than 20 cm high); if the plant is older but not yet flowering, pick the top 15-20 cm.  A lot of people use scissors or garden shears for harvesting, but we found it awkward to hold kitchen scissors with our big rubberized gloves, so just broke the stem off with gloved fingers for efficiency's sake.

Once you're home and ready to process the nettles, keep your gloves on while you break off the top young leaves and pull the older leaves from the stem.  Toss the stems and rejected leaves (brown, moth-eaten, bruised) into your composter.  Blanch the nettle in saltwater to neutralize the sting, and squeeze the nettle tea from them.  Hank Shaw provides a very good description of processing stinging nettles, so I will direct you there rather than taking up unnecessary space.  Save the nettle tea for this recipe, or to use as a substitute for vegetable broth in all sorts of dishes.


Stingin' in the Rain on Punk Domestics

26 May 2014

The Oldest Cocktails You'll Ever Drink

When Fefe Noir and caribougrrl go foraging for prehistoric water, it's just the tip of the iceberg...


It's a brilliant year for icebergs in our neck of the woods.  The more icebergs that drift down from Greenland, the more likely we are to find bits and pieces washed up on shore.

Along some parts of Newfoundland's coast, collecting iceberg pieces to use for cold drinks or to melt for fresh water is an annual ritual.  Down here in the southeast corner of the island, availability is a bit more hit and miss.  It's a good year for icebergs, so we've been scouring the coast for washed up ice and undertaking the terrible job of testing cocktail recipes worthy of ancient ice cubes.

Starting with the obvious ingredient of locally brewed Iceberg Beer (if you can't find this, substitute with a mexican lager), we bring you two cocktails perfect for drinking on the porch after mowing the lawn.


This beer-garita (left) and michelada (right) are made made with beer brewed with iceberg water and chilled with a few hunks of iceberg in the glass.


Iceberg Beer Michelada

sea salt
Use an ice pick or a chisel to crack up the iceberg bits.
small hunks of ice chipped from an iceberg
juice of 1/2 lime
juice from 1/2 small sweet orange (like a satsuma or clementine)
2 tsp jalapeno syrup
most of a bottle of iceberg beer

Salt the rim of a tall glass.  Fill glass with ice. Add the other ingredients in the order they are listed, give it a quick stir and garnish with citrus wedges and sliced jalapeno.
Both cocktails are salty and spicy.  The tequila gives the
beer-garita (left) a bigger kick.  The orange juice sweetens
the michelada (right) just enough to temper the salt.


Iceberg Beer-garita

sea salt
small hunks of ice chipped from an iceberg
juice of 1 lime
3 tsp jalapeno syrup
3/4 oz. silver tequila
iceberg beer

Salt the rim of a tall glass and fill with ice.  Add lime juice, tequila and syrup.  Give it a gentle stir then top up with beer.  Garnish with slices of fresh jalapeno and a wedge of lime.


~~~


(Ground-based) Iceberg Foraging and Handling


If the tide and currents are just right, you might come across a beach littered with car-trunk sized pieces of iceberg.  These are small in the grand scheme of an iceberg life, but they can be rather awkward to lug around.  Not only are they hard to get your arms around, but they're slippery as all get out.

The icebergs we see along the Avalon peninsula in the
southeast of Newfoundland have traveled about 3000 km
on their trip from western Greenland.
Foraging for usable iceberg pieces is serious business when you don't have a boat.  (We don't have a boat.)  You have to find bergy itty-bits that are big enough to make it worth the effort of bringing them home, but small enough you can wrangle them from the beach to the trunk of your car.  You are also confined to accessible beaches, and the tides and bergs are not always cooperative.

As the icebergs melt and crack and fall apart, small pieces
sometimes drift close enough to shore to capture.
Go for a drive, sticking to coastal roads.  Try not to be distracted by the spectacular view of gigantic, prehistoric, hunks of ice floating around willy-nilly in the ocean.  Be aware of them though, because they are a good sign that you might find some washed up bits, particularly when there are trails of broken up bits and pieces drifting toward shore.

The first day we went out looking for beached iceberg was the hottest day we've had yet this year.  The sun was shining, it was warm enough to wear short pants, and it was the Saturday of a long holiday weekend.  The holiday weekend when people head out to their cabins and summer homes for the first time in the year.  The holiday weekend at the beginning of tourist season.  There were people everywhere.  Every tiny, barely used side road, every dirt track down to a beach, every lookout.  But not one hunk of ice washed up... at least not one that has survived the eye of other iceberg foragers.

So here's another tip:  go out on a cold, foggy day.  Less competition.


To increase your chances of being the person in the right place at the right time, go iceberg foraging on cold, foggy days when the competition is low.
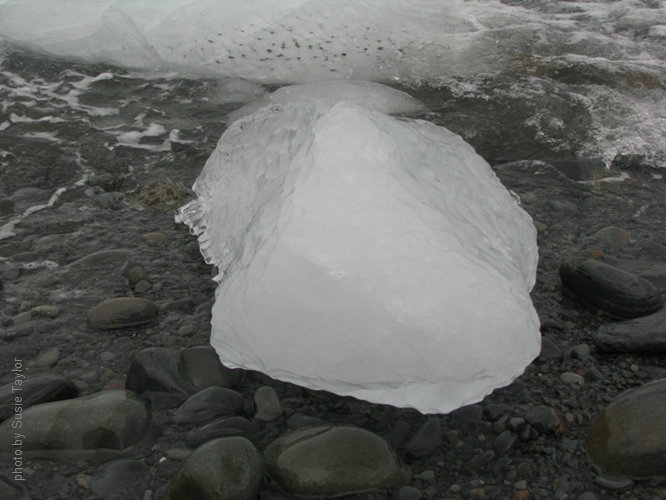
When you do find washed up ice on a beach you can get to, you want to be sure it's iceberg ice and not annual sea ice.  The pressure of thousands of years of snowfall accumulation results in a very hard ice, much harder than what's in your ice cube trays at home (sea ice is comparatively soft).  Most strikingly, iceberg ice is filled with tiny bubbles.  The same way the ice is made from water which froze 12,000 - 100,000 years ago, those bubbles are filled with air from the same time period.  Prehistoric water, prehistoric atmosphere. 


All those tiny bubbles in the ice are what make icebergs
appear white in colour.  They also contain air from tens
of thousands of years ago when the ice formed.
Despite all that air, the ice is heavy, so remember to lift with your legs.  If you have a pair of gloves handy, this will make the trip back to the car with your armload of ancient ice more comfortable.  You will get wet.  Waves will inevitably wash over your feet while you are wrestling the ice up to the tide line.  Your shirt will be soaked from carrying the berg, because, well, it's wet to begin with, and your body heat is enough to melt it a bit while you lug it.  So either wear your rubber boots and rain suit, or consider the frozen wetness a hazard of doing business... part of immersing yourself in the experience.

(Your mother-in-law's job during iceberg foraging trips is, apparently, to provide helpful advice from the back seat of the car.  She will be worried about your wet shirt.  Pay her no mind, it's not actually possible to catch the flu from an iceberg.  Also, unless you only took fist-sized pieces, she is wrong about it melting before you get home.)


If you wade out at all to retrieve ice, bear in mind that the water is still really cold this time of year.  Unless you're geared up with insulated waders, don't stand in it for too long.  Even prehistoric ice in your drink is not worth hypothermia.


Once you get it home, let the ice sit out for several hours to shed the salty seawater and any other surface contaminants.  If necessary, use a hammer and chisel to break it into hunks which will easily fit in your freezer.  Wrap well and freeze until needed.  Use the chisel again (or an actual ice pick) to break into drink-sized hunks.

If you want iceberg water, chisel into pieces small enough to maneuver into food-safe containers and leave it out to melt.  Bearing in mind that we've stopped heating the house because it's May (never mind that it's only a few degrees above freezing out, I'm in winter-denial): a large saucepan filled with iceberg pieces took nearly 3 days to melt completely, but there was enough for a pot of coffee by the time a day was gone.


~~~

Why bother with icebergs?  

There's something incredibly compelling about knowing you are holding the air and water that existed tens of thousands of years ago.  If you buy the local propaganda around iceberg products, this is water in it's purest form.  The scientist in me would argue that distilled water should be more pure, but there's no romance in distillation.  To be fair, this ice was formed before humans started burning petrochemicals and tossing plastic into the ocean, so the air and water is untainted by the industrial age.  I'm willing to forgive a bit of volcanic ash and some woolly mammoth farts captured in the Greenland glacial sheet, and think of it as the cleanest water available.  Plus, it's really really old, and that's just super cool. (Heh.  Get it?  Super cool...)
Get some really good coffee beans and use iceberg water
to brew up what might be the best cup of coffee you'll ever
drink.  

Definitely use the ice in cocktails. For one thing, it's a great conversation starter at a party.  For another, it's an excellent way to show off in front of your friends.  But also melt some water out and make coffee with it.  Trust me, it makes a seriously good cup of coffee.  Do NOT, however, waste iceberg water on Folgers or Maxwell House.  Go out and buy some really good coffee, in the form of fresh-roasted beans and grind it yourself.  Serendipitiously, we recently won some great coffee from Got My Beans through a The Food Gays giveway... definitely iceberg-water-worthy.

Choose ice that is small enough to handle, but big enough to be worth the effort of  the expedition.  After that, the choice is arbitrary.  This one reminded me of Tiktaalik emerging from primordial soup.  I left it because, well, it's creepy.
One of my all-time favourite Newfoundland words is "maggoty" and although the Dictionary of Newfoundland English will tell you the word refers primarily to salt cod which is full of blow-fly maggots, I've never heard it used to refer to actual maggots.  In my experience, it simply gets used to express that something is riddled with something else.  St. John's is maggoty with tourists in the summer.  The coast is maggoty with icebergs.

And it is, this year.  Maggoty with 'em.  The icebergs.  We're having a crummy, cold spring (minus that one Saturday), but it's a spectacular year for bergs.  Drop everything else and take advantage of it.


The best time to visit Newfoundland if you are hoping to see icebergs is during May and into early June.